

Hosting a static website on Amazon S3 and securely with CloudFront is an efficient and cost-effective AWS architecture. This tutorial shows you how to set it up, including creating an S3 bucket, enabling secure Origin Access Control, configuring edge delivery, and cleaning up resources. This hands-on tutorial provides everything you need, whether you are preparing for AWS certification, building a portfolio, or deploying a production-ready static site.
Why Use Amazon S3 + CloudFront to Host a Static Website?
Leveraging the modern AWS services to achieve reliable, secure, and scalable serverless static website hosting that adjusts effortlessly as the audience grows. Here are the valuable architectures:
- Amazon S3: provides durable, highly available object storage to host your HTML, CSS, and image files without managing a web server.
- Amazon CloudFront: AWS’s global Content Delivery Network (CDN) distributes your content across hundreds of edge locations worldwide, diminishing latency for end users regardless of their geographic location.
- Origin Access Control (OAC): Ensures the S3 bucket is never directly accessible from the public internet; all traffic must flow through CloudFront, thereby improving the security posture.
Prerequisites
- An active AWS account
- Basic familiarity with the AWS Management Console
- Prepare your static website files for upload to launch your project successfully (in this tutorial: index.html, style.css, kb.png, aws.png, icon.png).
Step 1 — Create an S3 Bucket
The first step is to create an S3 bucket to store your static website files. Remember, S3 bucket names must be globally unique across all AWS accounts and regions. If your chosen name is already taken, choose another.
- In AWS Management Console, go to S3.
- Click the Create bucket.
- Enter a globally unique bucket name. For this tutorial, we use: kb-aws-hsp
- Select the Region: us-east-1 (US East — N. Virginia).
- Leave Block all public access enabled; CloudFront will handle access via OAC, so direct public access is unnecessary and should remain blocked.
- Click Create bucket to finish.
Step 2 — Upload Your Website Files to the S3 Bucket
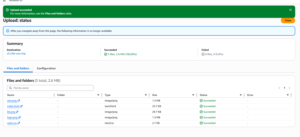
With the bucket ready, upload your website files. Once the upload completes, your website files are stored in S3, but they are not yet publicly accessible. That access will be handled exclusively through CloudFront.
- Open your newly created bucket.
- Click Upload → Add files.
- Select all five files: index.html, style.css, kb.png, aws.png, and icon.png.
- Click Upload.
Step 3 — Create a CloudFront Distribution
The core of the architecture is to create a CloudFront distribution. Set your S3 bucket as the origin. Configure secure access using Origin Access Control.
- Go to CloudFront in the AWS Console.
- Click Create distribution.
- Name it and click next
Configure the Origin
|
Origin type
|
Select your S3 bucket (e.g., kb-aws-hsp.s3.amazonaws.com)
|
|
Origin access
|
Origin access control settings (recommended)
|
- Under Origin browse and choose your S3 bucket.
Configure the Viewer Settings
|
Viewer protocol policy
|
Redirect HTTP to HTTPS |
|
Allowed HTTP methods
|
GET, HEAD |
Web Application Firewall (WAF)
For this tutorial, select Do not enable security protections. Be cautious. If you enable WAF during testing, delete the WAF Web ACL and associated rules after you finish. Otherwise, you will incur ongoing charges.
Additional Settings
|
Price class
|
Use all edge locations (best performance) |
|
Alternate domain name (CNAME)
|
Leave blank (optional for custom domains) |
|
Default root object
|
index.html
|
- Click Create distribution.
CloudFront takes a few minutes to deploy your distribution globally across all AWS edge locations.
Step 4 — Attach the CloudFront-Generated Policy to Your S3 Bucket
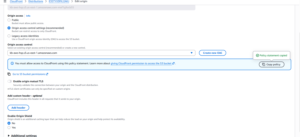
When you created the OAC in Step 3, CloudFront generated a bucket policy that you must now attach to your S3 bucket. This policy grants CloudFront permission to read objects from your bucket.
How to copy the policy from CloudFront
- Go to CloudFront → Distributions → open your distribution.
- Select the Origins tab.
- Select your S3 origin, then click Edit.
- Name it and click Create. This OAC will generate a bucket policy that allows CloudFront — and only CloudFront — to access your S3 bucket
- Click Copy policy under Origin access.
Attach the policy to your S3 bucket.
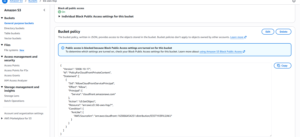
- Return to S3, open your bucket.
- Go to the Permissions tab.
- Click Edit under Bucket policy.
- Paste the copied policy.
- Click Save changes.
Your bucket now accepts requests only from CloudFront.
Step 5 — Access Your Site via CloudFront
Your distribution has been deployed, and your bucket policy is in place. Time to access your site.
- Go to CloudFront → Distributions.
- Copy the Domain name of your distribution (e.g., d1bpxeei7j3k9a.cloudfront.net).
- Paste it into your browser.
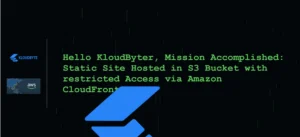
Good job! Your static website is now live, served securely through Amazon CloudFront, distributed across AWS edge locations worldwide, and with zero direct exposure of your S3 bucket.
Bonus: Two Useful CloudFront Features to Explore
Can you restrict access to specific countries?
Yes. CloudFront supports geographic restrictions at the distribution level:
- Open your distribution → Security tab.
- Under CloudFront geographic restrictions, click Edit.
- Choose between an Allow list (only listed countries can access) or a Block list (listed countries are denied access).
This is useful for compliance requirements or to block regions you do not serve.
How do you retrieve the bucket policy generated by CloudFront?
If you need to retrieve it again at any time:
- Open your distribution → Origins tab.
- Select your S3 origin and click Edit.
- Under Origin access, click Copy policy.
Step 6 (Optional) — Verify Direct S3 Access Is Blocked
This optional step confirms that your architecture is working as intended and that your site files are accessible only through CloudFront, not via the direct S3 URL. You should receive an AccessDenied error. This is the expected and correct behavior, which confirms that your bucket policy is properly enforced and that all access is routed exclusively through CloudFront.
Try accessing your index.html file directly using the S3 URL format: https://kb-aws-hsp.s3.amazonaws.com/index.html
Step 7 — Clean Up Your Resources
Delete all resources you created in this tutorial to avoid AWS charges. Follow the correct order.
1. Disable and Delete the CloudFront Distribution
- Go to CloudFront → Distributions.
- Select your distribution. Click Disable.
- Wait about 5 minutes for disabling. Monitor the Status column.
- Once the status shows Disabled, select the distribution again and click Delete.
2. Delete the Origin Access Control
- Go to CloudFront, then select Origin access.
- Under Origin access control settings, select the OAC you created and click Delete.
3. Empty and Delete the S3 Bucket
If you enabled WAF, delete the WAF WebACL and associated ACL rules from the WAF & Shield console.
- Go to S3 and open your bucket.
- Click Empty and confirm the action. ( Bucket must be empty before deletion.)
- After emptying, click Delete and confirm the bucket name.
Conclusion
Hosting a static website on Amazon S3 with CloudFront is a production-grade, serverless, and cost-efficient AWS deployment pattern. The pattern follows AWS best practices for secure, high-performance static website delivery: S3 stores your assets privately; CloudFront acts as the public CDN and secure proxy. With Origin Access Control, only CloudFront fetches content from S3. Enforcing HTTPS encrypts user traffic, while Edge locations cache content near users to reduce latency. For extra production security, enable WAF and logging, and use Origin Access Control (OAC)—the recommended replacement for Origin Access Identity (OAI)—to secure your S3 origin. Never allow direct public access to the S3 bucket; always confirm that direct S3 URLs return an AccessDenied error. After testing, clean up your CloudFront distributions, OAC settings, and S3 buckets to avoid unexpected charges.

