

Building highly available, fault-tolerant applications is a core competency for any AWS architect or engineer. In this tutorial, you will learn how to create an Auto Scaling Group (ASG) with Elastic Load Balancing (ELB) on AWS, combining two of the most powerful services in the AWS compute ecosystem to deliver automatic scalability, resilience, and traffic distribution across multiple EC2 instances.
By the end, you will have a working web application distributed across multiple EC2 instances, using an Application Load Balancer and protected by Auto Scaling policies that automatically replace failed instances.
Why Auto Scaling + Elastic Load Balancing?
Before diving into the configuration steps, it is worth understanding why this combination is so fundamental to AWS architecture:
- Auto Scaling Groups (ASGs) automatically launch or terminate EC2 instances based on demand or health. If an instance fails, the ASG detects it and replaces it without manual intervention.
- Elastic Load Balancing (ELB) distributes incoming traffic across all healthy instances in your ASG. No single instance gets overwhelmed, and failed instances are automatically removed from the rotation.
- Together, these services form the backbone of highly available, self-healing architectures on AWS, a pattern used in virtually every production workload.
Prerequisites
Before starting, ensure the following are in place:
- SSH Key Pair: Ensure you have an existing key pair (e.g., ssh-aws-kb ) in your AWS region. If you do not have one, navigate to EC2 → Key Pairs → Create key pair and create it now.
- Default Security Group: Verify that the default security group in your VPC allows inbound rule traffic on port 80 (HTTP). Without this, your web server will not be reachable through the load balancer.
Step 1 — Create the Auto Scaling Group
An Auto Scaling Group requires a Launch Template, which defines the configuration for the EC2 instances it launches. Create both in this step.
1.1 — Create the Launch Template
- Go to EC2 → Instances → Launch Templates.
- Click Create launch template.
- Configure the template as follows:
|
Launch template name
|
template-kb
|
|
AMI
|
Amazon Linux (latest) |
|
Instance type
|
t3.micro
|
|
Key pair
|
ssh-aws-kb
|
|
Security group
|
Default |
- Expand Advanced details and scroll to the User data field.
- Paste the following Bash script:
#!/bin/bash
yum update -y
yum install -y httpd
systemctl start httpd
systemctl enable httpd
echo "<h1 style=\"background-color: #FEFEFF; color: rgb(255, 153, 0); font-size: 50px;\">KB <br> Kloudbyte AWS Lab <br> EC2 Instance IP Address: <span style=\"color: rgb(15, 234, 63);\"> $(hostname -f)</span> </h1>" > /var/www/html/index.html
This User Data script runs automatically at instance launch. It installs and starts the Apache HTTP server (httpd), enables it to start on reboot, and creates a simple index.html page that displays the EC2 instance’s private IP address, which will be key for validating load-balancing behavior later.
- Click Create launch template.
1.2 — Create the Auto Scaling Group
- Go to EC2 → Auto Scaling → Auto Scaling Groups.
- Click Create Auto Scaling group.
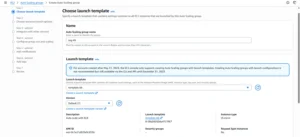
- Set the Auto Scaling group name to asg-kb.
- Under the Launch template, select template-kb and click Next.
1.3 — Configure Network Settings
On the Choose instance launch options page, select multiple Availability Zones and subnets. Distributing instances across AZs is what gives your application true high availability; if one AZ experiences an outage, your instances in other AZs continue serving traffic uninterrupted. Click Next.
1.4 — Configure Load Balancing
This is where you integrate Elastic Load Balancing with your Auto Scaling Group:
- Select Attach to a new load balancer.
- Select Application Load Balancer.
- Configure it as follows:
|
Load balancer name
|
asg-kb-1
|
|
Scheme
|
Internet-facing |
|
Listener port
|
80 |
|
Default routing (forward to)
|
Create a target group: asg-kb-1
|
An Application Load Balancer (ALB) operates at Layer 7 (HTTP/HTTPS) for web applications. Internet-facing mode lets it receive public traffic and direct it to target EC2 instances.
1.5 — Configure the Health Checks
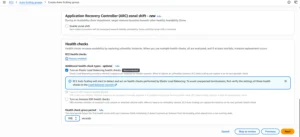
- Under EC2 health checks, enable Turn on Elastic Load Balancing health checks.
- Set the Health check grace period to 180 seconds.
The grace period lets instances finish setup before health checks begin, preventing false unhealthy statuses.
Click Next.
1.6 — Configure Group Size and Scaling Policies
|
Desired capacity
|
2 |
|
Minimum capacity
|
1 |
|
Maximum capacity
|
3 |
|
Automatic scaling
|
No scaling policies |
|
Instance replacement behavior
|
No policy (Mixed behavior) |
With a desired capacity of 2, the ASG will immediately launch 2 EC2 instances upon creation. The minimum of 1 ensures at least one instance is always running, and the maximum of 3 caps your spend during scaling events. Click Next.
1.7 — Add Notifications (Optional)
Skip this section for now and click Next.
1.8 — Add Tags
Tags are essential for identifying and managing resources, especially in shared AWS accounts:
|
Name
|
asg-webserver
|
Note: The key Name must be capitalized with an uppercase “N”. AWS uses this tag to display a friendly name for your EC2 instances in the console.
Click Next, review the configuration summary, and click Create Auto Scaling Group.
Step 2 — Validate Direct Access to Each EC2 Instance
After the ASG creates two EC2 instances, check that each serves the web page before testing the load balancer.
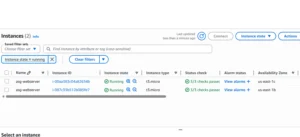
- Go to EC2 → Instances.
- Locate the two instances tagged asg-webserver.
- Copy each instance’s public IP address.
- Open each IP in your browser (e.g., http://<PUBLIC-IP>).
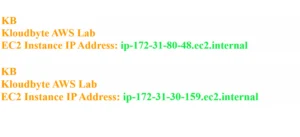
Confirm the styled web page displays the private IP of each instance. Ensure both show their unique private IPs. This confirms that Apache is running and that the User Data script succeeded.
Step 3 — Test Access and Load Balancing via the Application Load Balancer
Verify the end-to-end load-balancing behavior now.
- Go to EC2 → Load Balancing → Load Balancers.
- Select asg-kb-1 and copy its DNS name (e.g., asg-kb-1-123456789.us-east-1.elb.amazonaws.com).
- Paste the DNS name into your browser.
You should see the web page through the load balancer. Refresh the page multiple times. Watch the private IP address alternate between your two EC2 instances. This shows the ALB distributing requests in a round-robin pattern across both healthy targets.
Elastic Load Balancing routes each request to a healthy instance, so no single server handles all traffic.
Step 4 — Simulate an EC2 Instance Failure
This is the most important test in any high-availability architecture, simulating a real instance failure and observing the system’s self-healing behavior.
- Go to EC2 → Instances.
- Select one of the asg-webserver instances.
- Go to Instance State → Terminate instance and confirm.
Now observe what happens:
- Immediately: The terminated instance will appear as unhealthy in the Target Group (asg-kb-1). The ALB will stop routing traffic to it. Your application will continue running on the remaining instances, and users will experience no downtime.
- The Auto Scaling Group detects the drop and quickly launches a replacement using the launch template.
- After the health check grace period, the new instance passes ELB health checks and begins receiving traffic.
Navigate to EC2 → Load Balancing → Target Groups → asg-kb-1 → Targets to monitor the registration and health status of instances in real time.
This behavior, automatic detection, traffic rerouting, and instance replacement, is the core value proposition of combining Auto Scaling Groups with Elastic Load Balancing.
Step 5 — Clean Up Resources
Delete all resources in the correct sequence to prevent lingering charges. AWS enforces dependencies between these resources.
1. Delete the Auto Scaling Group
- Go to EC2 → Auto Scaling → Auto Scaling Groups.
- Select asg-kb. Choose Actions, then select Delete.
- Confirm the deletion. Allow the ASG to automatically terminate the associated EC2 instances.
- Wait 5 minutes for this process to complete.
2. Delete the Launch Template
- Go to EC2 → Instances → Launch Templates.
- Select template-kb. Choose Actions, then select Delete template.
3. Delete the Load Balancer
- Go to EC2 → Load Balancing → Load Balancers.
- Select asg-kb-1. Choose Actions, then select Delete load balancer.
4. Delete the Target Group
Wait 2 minutes after deleting the load balancer, then delete the target group. Allow AWS to deregister all targets and fully disassociate the load balancer.
- Go to EC2 → Load Balancing → Target Groups.
- Select asg-kb-1 → Actions → Delete.
Conclusion
This lab is part of the hands-on AWS learning series. Each step reflects real-world AWS best practices for building resilient, scalable compute architectures with autoscaling that manages the instance fleet, maintains the desired capacity, and replaces unhealthy instances. A target group registers running instances and tracks their health status; an ALB distributes HTTP traffic across healthy registered targets; and a launch template defines the configuration of each instance at launch. Finally, terminating an instance is the real-world validation test for any autoscaling architecture, so always run in dev environments to confirm that self-healing works end-to-end before production deployment.

