
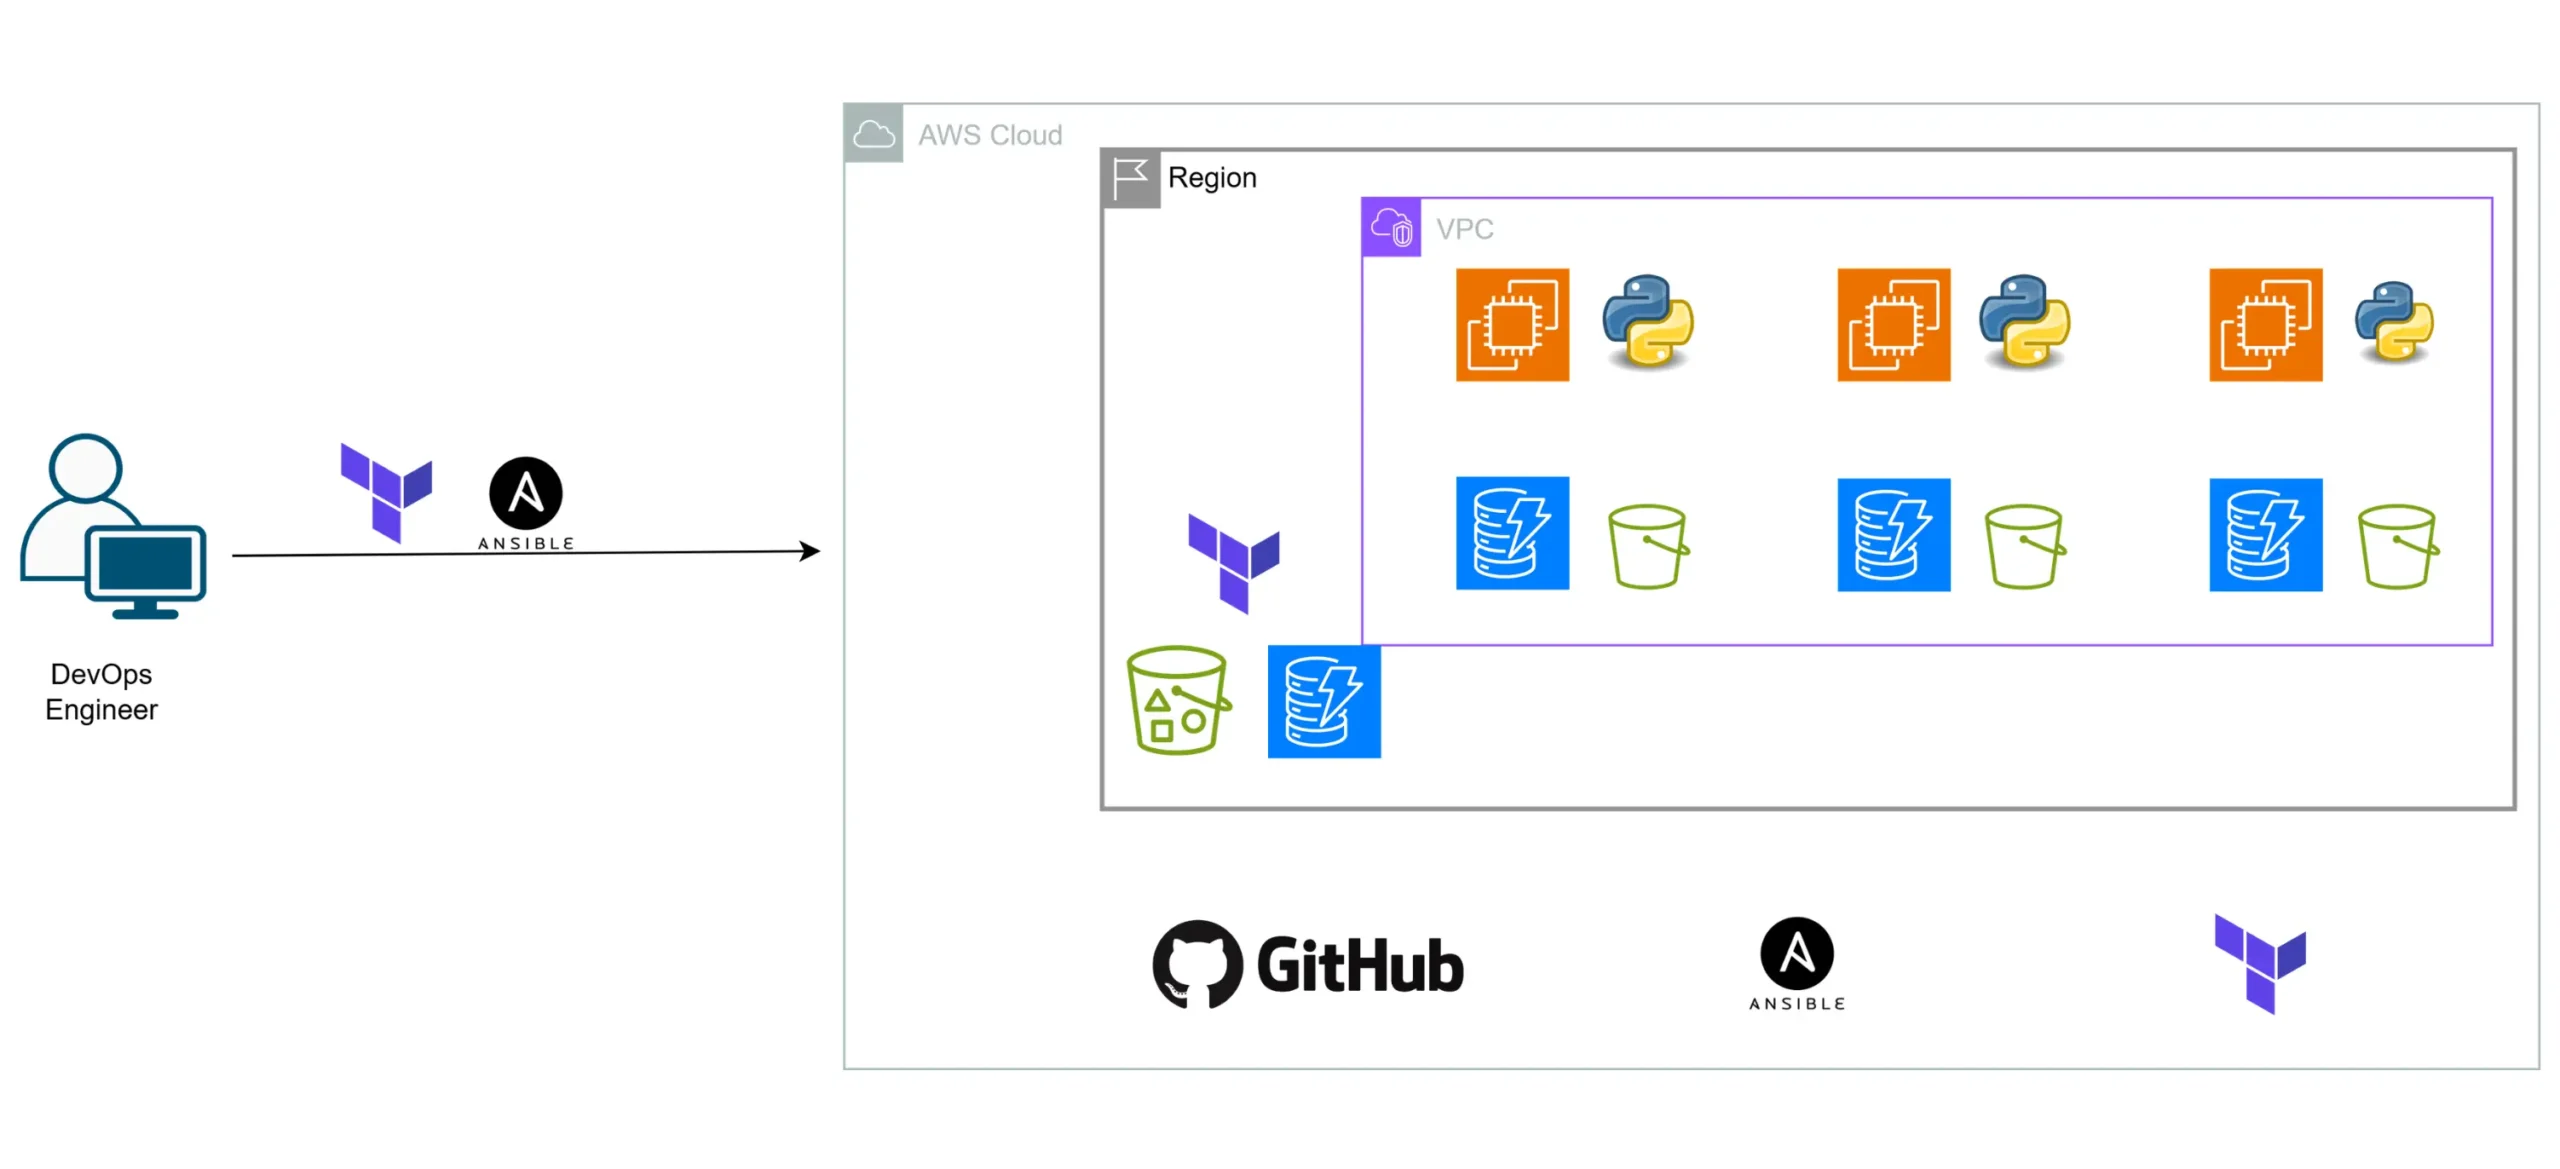
The last KloudGov series covered building reusable Terraform modules, securing remote state, and automating deployment with an OIDC-authenticated CI/CD pipeline. That infrastructure EC2 instances, DynamoDB tables, S3 buckets all provisioned per tenant, is solid. But provisioning infrastructure and configuring and deploying an application on it are two different problems, and this new series tackles the second.
This is Part 1 of a three-part project: deploying the KloudGov SaaS application onto AWS EC2 instances across multiple US states, using Ansible for configuration management, with configuration files stored securely on AWS CodeCommit. The series is structured deliberately to make a point along the way:
Part 1 (this post) — preparing the Terraform-managed infrastructure with the IAM roles, security groups, and access rules the application actually needs.
Part 2 — deploying the application manually, without automation, to feel the real effort and risk involved.
Part 3 — deploying the same application with Ansible playbooks and roles, to see exactly how much automation changes.
That middle step is intentional. Before reaching for Ansible, it’s worth sitting with the pain of doing it by hand, because that’s what makes the payoff in Part 3 legible rather than abstract.
Why This Step Comes Before Any Ansible Work
Ansible configures and deploys onto infrastructure; it doesn’t provision the infrastructure itself. Before any playbook can run, the EC2 instance it targets must already exist, with the appropriate network access and permissions to communicate with other AWS services the application depends on (in this case, S3 and DynamoDB).
That’s the entire purpose of this first post: to update the Terraform layer from the last series so it produces infrastructure that’s actually ready for an application deployment, not just a bare EC2 instance sitting in a security group.
Step 1: Validating the Current Terraform Code
Before making any changes, confirm the existing configuration from the previous series still applies cleanly:
cd kloud-gov-infrastructure/terraform
terraform plan
terraform apply
terraform destroy -auto-approve
This is the same discipline covered in the last series: validate before you build on top of something. If plan or apply surface anything unexpected here, it’s worth resolving before adding new resources on top of a shaky foundation.
For this stage of the project, scale the configuration down to a single-tenant Michigan, using the same approach used earlier when validating the remote backend. There’s no reason to provision three full stacks while iterating on IAM and security group changes:
variable "states" {
  description = "A list of state names"
  default     = ["michigan"]
}
With a single tenant, each terraform apply during this testing phase is faster, and the AWS Console is easier to read while validating that everything’s wired up correctly. Once confirmed, scaling back to the full state list is just a one-line change.
Step 2: Creating an AWS IAM Role and Instance Profile
This is the core addition in this post. The KloudGov application, once deployed, needs to interact directly with S3 and DynamoDB from the EC2 instance for tasks such as storing application data or reading configuration. That means the EC2 instance itself needs AWS permissions, and the correct way to grant an EC2 instance permissions is through an IAM Role attached via an Instance Profile, never by placing static AWS credentials on the instance itself.
Add the following to modules/aws_kloudgov_infrastructure/main.tf, right after the existing aws_s3_bucket.state_s3 block:
# Create an IAM Role for EC2 to access S3 and DynamoDB
resource "aws_iam_role" "s3_dynamodb_full_access_role" {
  name = "kloudgov-${var.state_name}-s3_dynamodb_full_access_role"

  assume_role_policy = <<EOF
{
  "Version": "2012-10-17",
  "Statement": [
    {
      "Action": "sts:AssumeRole",
      "Principal": {
        "Service": "ec2.amazonaws.com"
      },
      "Effect": "Allow",
      "Sid": ""
    }
  ]
}
EOF

  tags = {
    Name = "kloudgov-${var.state_name}"
  }
}

# Attach AmazonS3FullAccess policy to the IAM Role
resource "aws_iam_role_policy_attachment" "s3_full_access_role_policy_attachment" {
  role       = aws_iam_role.s3_dynamodb_full_access_role.name
  policy_arn = "arn:aws:iam::aws:policy/AmazonS3FullAccess"
}

# Attach AmazonDynamoDBFullAccess policy to the IAM Role
resource "aws_iam_role_policy_attachment" "dynamodb_full_access_role_policy_attachment" {
  role       = aws_iam_role.s3_dynamodb_full_access_role.name
  policy_arn = "arn:aws:iam::aws:policy/AmazonDynamoDBFullAccess"
}

# Create an IAM Instance Profile for the EC2 instance
resource "aws_iam_instance_profile" "s3_dynamodb_full_access_instance_profile" {
  name = "kloudgov-${var.state_name}-s3_dynamodb_full_access_instance_profile"
  role = aws_iam_role.s3_dynamodb_full_access_role.name

  tags = {
    Name = "kloudgov-${var.state_name}"
  }
}
A few things worth understanding here, not just copying:
- The assume_role_policy (trust policy) is what makes this role assumable specifically by EC2 instances. The “Service”: “ec2.amazonaws.com” principal means only EC2 can assume this role, not any other AWS service or account.
- Two managed policy attachments, AmazonS3FullAccess and AmazonDynamoDBFullAccess, grant the role broad access to both services. This is intentionally permissive for the PoC stage of this project; a production deployment would tighten these down to specific bucket and table ARNs, the same way the CI/CD pipeline’s IAM role was scoped in the previous series.
- The Instance Profile is the actual object EC2 attaches to an instance; a role by itself can’t be assigned directly to EC2; it has to be wrapped in an instance profile first. This is a common point of confusion for anyone newer to IAM: roles and instance profiles are two separate resources that work together.
Step 3: Associating the Instance Profile with the EC2 Instance
With the role and profile defined, the EC2 instance resource needs to actually reference it. Inside the aws_instance.state_ec2 block, add the following line directly after vpc_security_group_ids:
iam_instance_profile = aws_iam_instance_profile.s3_dynamodb_full_access_instance_profile.name
This single line connects everything; without it, the role and instance profile exist in AWS but are attached to nothing, and the EC2 instance would have no way to authenticate with S3 or DynamoDB.
Step 4: Adding Application Access Rules to the Security Group
The security group from the earlier series only opened ports 22 (SSH) and 80 (HTTP), which is enough for basic connectivity testing but not for what’s coming in Part 3. The KloudGov application itself runs on port 5000, and Ansible needs a reliable way to reach the instance from the machine running the playbooks.
Replace the two existing ingress rules with the following expanded set:
ingress {
  from_port   = 22
  to_port     = 22
  protocol    = "tcp"
  cidr_blocks = ["0.0.0.0/0"]
}

ingress {
  from_port   = 80
  to_port     = 80
  protocol    = "tcp"
  cidr_blocks = ["0.0.0.0/0"]
}

ingress {
  from_port   = 5000
  to_port     = 5000
  protocol    = "tcp"
  cidr_blocks = ["0.0.0.0/0"]
}

ingress {
  from_port       = 0
  to_port         = 0
  protocol        = "-1"
  security_groups = ["<INSERT_YOUR_EC2/IDE_SECURITY_GROUP_ID>"]
}

egress {
  from_port   = 0
  to_port     = 0
  protocol    = "-1"
  cidr_blocks = ["0.0.0.0/0"]
}
Breaking down what each rule does:
- Port 22 (SSH) and Port 80 (HTTP) unchanged from before, covering basic access and web traffic.
- Port 5000 is opened specifically for the KloudGov application, which will be deployed and run on this port starting in Part 3.
- The all-protocol rule is scoped to a specific security group ID; it is notably tighter than the others. Instead of opening a port to the entire internet (0.0.0.0/0), it allows all traffic only from instances belonging to your EC2/IDE security group, meaning your development EC2 instance can reach this application instance freely (useful for Ansible, which will connect from that IDE machine), without opening that same access to the public internet. Replace <INSERT_YOUR_EC2/IDE_SECURITY_GROUP_ID> with the actual security group ID of your development instance.
- Egress, outbound traffic is left fully open, which is standard practice; egress restrictions matter far less for security than tightly scoping inbound access.
A Note on the SSH Key
This project reuses the same SSH key from the original infrastructure series: kloudgov-ec2-key. If you’ve deleted it since then, recreate it under the exact same name, and upload the .pem file to your VS Code session’s home folder (ec2-user). Keeping the name consistent avoids having to update key references across multiple .tf files.
Step 5: Provisioning the Updated Infrastructure
With the IAM role, instance profile, and expanded security group rules all in place, apply the changes:
terraform plan
terraform apply -auto-approve
Since the configuration is currently scoped to just [“michigan”], this should be a fast, single-instance apply, ideal for confirming everything is wired correctly before scaling back out to the full state list.
Step 6: Validating in the AWS Console
Once apply completes, confirm two things directly in the AWS Console:
EC2 — the instance exists, is running, and its security group shows the newly added rules (ports 22, 80, 5000, and the scoped internal rule).
IAM — under Roles, confirm kloudgov-michigan-s3_dynamodb_full_access_role exists, with both the S3 and DynamoDB managed policies attached, and that it’s correctly associated with the EC2 instance under the instance’s Security tab (look for “IAM Role” listed there).
This validation step matters; it’s much easier to catch a misconfigured instance profile now, with a single test instance, than to debug it later, once Ansible tries to connect and fails for reasons unrelated to Ansible itself.
Step 7: Committing Changes to the Local Repository
With everything validated, commit the updated Terraform configuration:
git status
git add .
git status
git commit -m "Added IAM Role to Terraform module"
Note: this intentionally stops at a local commit, depending on your workflow from the previous series; you may want to push this through a pull request so the CI/CD pipeline’s Terraform plan runs and surfaces the diff for review before merging to main, consistent with the GitOps pattern established earlier.
Step 8: Destroying Resources
Since this stage was purely about validating the IAM and security group additions, tear down the test resources when finished:
terraform destroy -auto-approve
Then close your remote connection and stop your EC2/IDE instance to avoid unnecessary compute costs.
Why This Foundation Matters
It’s tempting to treat IAM and security group configuration as a formality on the way to “the real work” of deploying an application. In practice, this is exactly the layer where deployments quietly fail in ways that are hard to diagnose. An application that can’t reach S3 because of a missing instance profile, or a playbook that can’t connect because port 5000 was never opened, doesn’t look like an infrastructure problem when you’re staring at it. It looks like the application is broken, or Ansible is misconfigured. Getting the IAM role, instance profile, and security group rules right before introducing either manual deployment steps or Ansible automation removes an entire category of debugging from the parts of this series still to come.
Key Takeaways
- Ansible configures and deploys onto infrastructure; it doesn’t provision it. Terraform still owns getting the EC2 instance, its permissions, and its network rules into the right shape first.
- EC2 instances should never carry static AWS credentials. An IAM Role wrapped in an Instance Profile is the correct, secure pattern for granting an instance permissions to other AWS services.
- Testing infrastructure changes against a single tenant (Michigan) before scaling back out to the full state list keeps iteration fast and the AWS Console easy to read while validating.
- Security group rules should be as tightly scoped as the use case allows; note the difference between opening port 5000 to the world versus scoping the internal management rule to a specific security group ID.
- Validating IAM role attachment and security group rules in the AWS Console before moving on saves significant debugging time once actual deployment steps are layered on top.
With the infrastructure now properly prepared, Part 2 puts this to the test the hard way: deploying the KloudGov application manually, without automation, to see firsthand exactly what Ansible will save us in Part 3.

