
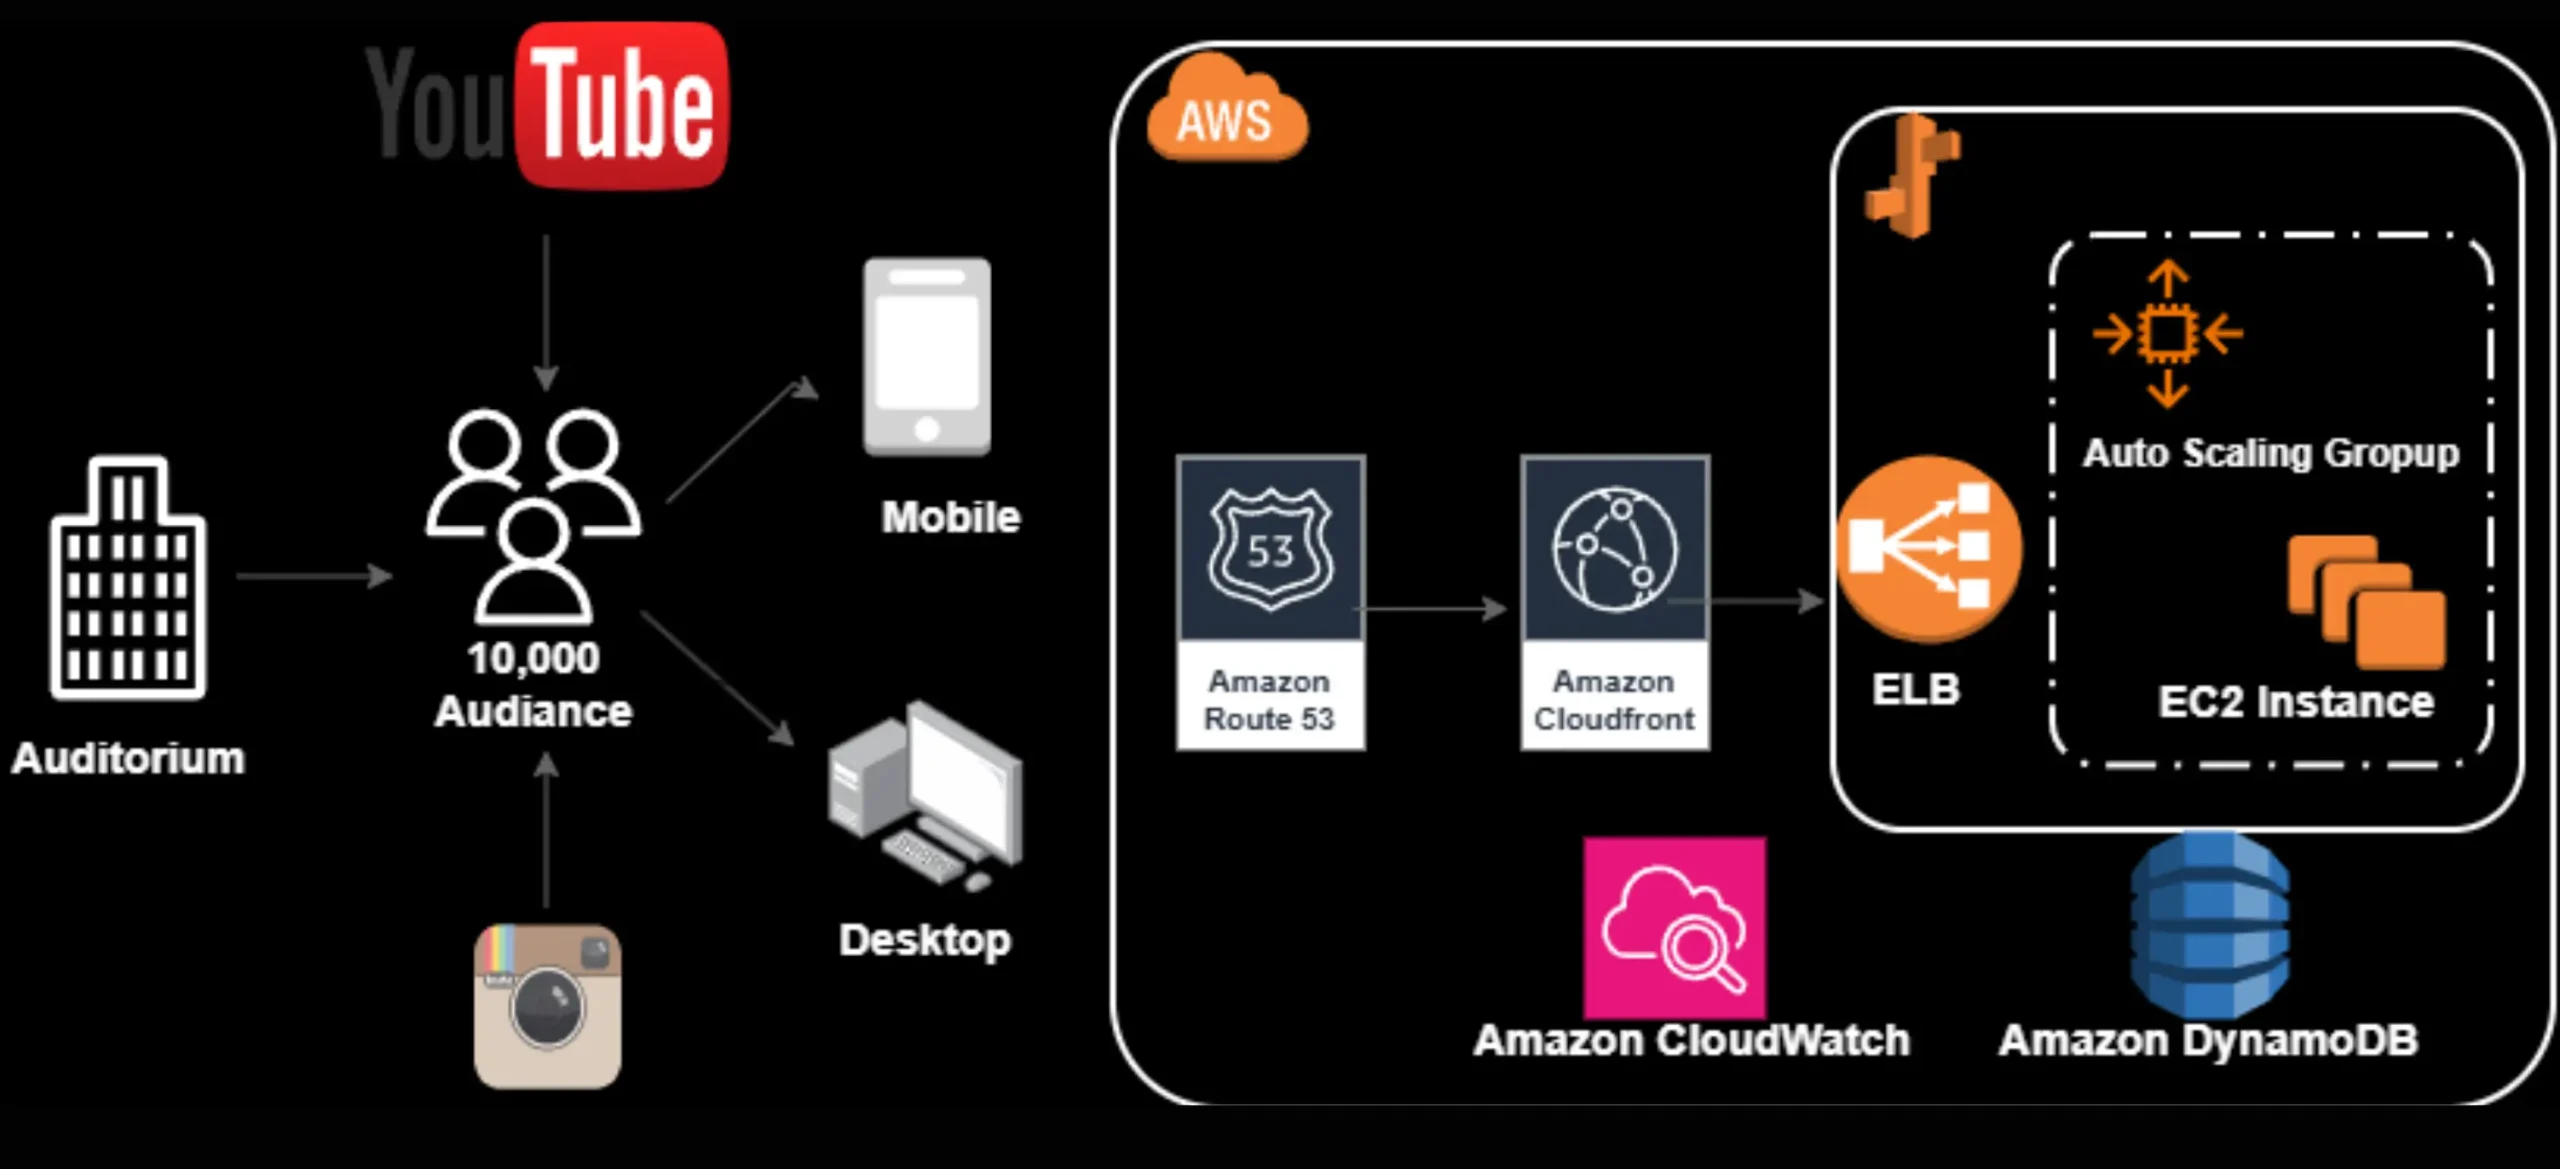
What does deploying a production-grade application for over 10,000 global simultaneous users without performance issues involve?
Meeting this challenge required innovation approach for the KloudByte Bootcamp Conference. I designed and deployed a scalable web application on AWS to manage live raffle registration. Global attendees, both in person and online, submitted their email addresses for a chance to win one of 10 AWS certification vouchers. All at once. All expected speed and responsiveness. To achieve this seamless performance, thoughtful design choices were necessary. Building on this foundation, the next step was to ensure global reach and reliability.
Architecture Overview
Here’s a summary of the AWS services used and their roles:
|
Elastic Beanstalk
|
Application deployment with Auto Scaling and EC2 management |
|
Amazon DynamoDB
|
Fast, serverless NoSQL storage for user email registrations |
|
Amazon CloudFront
|
CDN for global content delivery via Edge Locations |
|
Amazon Route 53
|
DNS resolution and traffic routing |
|
Amazon CloudWatch
|
Continuous monitoring, observability, and proactive alerts |
Project Structure
This project is divided into three parts:
- Part 1 — Creating DynamoDB and deploying the application with Elastic Beanstalk
- Part 2 — Testing the application and configuring CloudFront (CDN)
- Part 3 — Load testing and validating Auto Scaling
Part 1: Creating DynamoDB and Deploying with Elastic Beanstalk
Step 1 — Create the DynamoDB Table
- Table Name: users
- Partition Key (Primary Key): email

DynamoDB’s serverless nature means there’s no infrastructure to provision — it scales automatically and delivers single-digit millisecond response times, making it ideal for high-throughput event-driven workloads.
Step 2 — Review Existing AWS Resources
- EC2: Security Groups, Load Balancers, Target Groups, Auto Scaling Groups
- IAM Roles: Search for any existing elastic roles
- Elastic Beanstalk Service Role — for environment orchestration
- EC2 Instance Profile — for EC2 permissions within the environment
- Elastic Load Balancing Role — created automatically during provisioning
Step 3 — Generate an SSH Key Pair (Optional)
- Navigate to EC2 > Network & Security > Key Pairs > Create key pair
- Name: ssh-aws-kb-boot
- Format: .pem
Step 4 — Deploy the Application with Elastic Beanstalk
This is the stage where core infrastructure components are combined into Elastic Beanstalk, an AWS service that deploys and manages applications, handles environment orchestration (organizing the resources needed to run the app), and provides Auto Scaling and load balancing. Let’s configure the application logic while AWS manages the underlying resources.
Step 1 — Configure the Environment
- Environment Tier: Web server environment
- Application Name:
kb-conference - Platform: Python (Recommended version)
- Application Code: Upload your deployment package via S3 URL
- Presets: High availability
Step 2 — Configure Service Access (IAM Roles)
Create two IAM roles from within the Elastic Beanstalk setup wizard:
Elastic Beanstalk Service Role:
- Trusted Entity: AWS Service → Elastic Beanstalk
- Use Case: Elastic Beanstalk – Environment
- Role Name:
aws-elasticbeanstalk-service-role
EC2 Instance Profile:
- Trusted Entity: AWS Service → Elastic Beanstalk
- Use Case: Elastic Beanstalk – Compute
- Role Name:
aws-elasticbeanstalk-ec2-role
After creating each role, return to the Elastic Beanstalk wizard, refresh the dropdown, and select the appropriate role.
Step 3 — Networking
Let’s use the Default VPC for now and enable all the Instance Subnets (across all Availability Zones) to ensure multi-AZ high availability. Enable Public IP for testing purposes.
Step 4 — Instance Traffic and Scaling
This is the critical configuration block for scalability. The Auto Scaling Group is tuned to respond to CPU pressure:
- Instance Type:
t2.micro - Root Volume: General Purpose SSD, 10 GB
- Min Instances: 2 | Max Instances: 4
- Scaling Metric: CPUUtilization
- Upper Threshold: 50% → Scale up by 1
- Lower Threshold: 40% → Scale down by 1
- Period: 1 minute | Breach Duration: 1 minute
Starting with a minimum of 2 instances across multiple AZs ensures the application remains available even if one instance or availability zone experiences issues.
Step 5 — Environment Properties
Under the Environment properties, add:
- Name:
AWS_REGION| Value:us-east-1
Step 6 — Review and Deploy
Review all the configurations and click Create. Elastic Beanstalk will provision the EC2 instances, load balancer, target groups, and Auto Scaling Group automatically.
Part 2: Testing the Application and Configuring CloudFront
Step 1 — Validate Provisioned Resources
After deployment, confirm Elastic Beanstalk created all the expected resources:
- IAM Roles
- EC2 Instances and Security Groups
- Load Balancer and Target Groups
- Auto Scaling Group
Step 2 — Test the Application
Go to the Elastic Beanstalk environment domain and verify the application loads correctly on both desktop and mobile.
Step 3 — Test DynamoDB Storage
Try registering a test email (e.g., abcd@abc.com). If registration fails, check the Elastic Beanstalk Logs under:
Logs → Request Logs → Last 100 Lines
This expose the root cause and in this case, a missing DynamoDB permission on the EC2 instance profile.
Step 4 — Grant DynamoDB Access to the EC2 Role
- Go to IAM → Roles →
aws-elasticbeanstalk-ec2-role - Click Add permissions → Attach policies
- Attach: AmazonDynamoDBFullAccess
Re-test email registration. Then validate the entry in DynamoDB → Tables → Explore items.
Step 5 — Create and Configure CloudFront Distribution
CloudFront is the final performance layer that caches content in Edge Locations geographically close to users, reducing latency for a globally distributed audience.
Step 1 — Create the Distribution
- Distribution Name:
kb-conference - Distribution Type: Single website or app
Step 2 — Specify Origin
- Origin Type: Elastic Load Balancer
- Select the load balancer provisioned by Elastic Beanstalk
Step 3 — Security
For this project, WAF protections are disabled to avoid unnecessary charges. For production, enabling AWS WAF is strongly recommended.
Step 4 — Create
CloudFront deployment takes approximately 5 minutes. Monitor the Last Modified status until deployment completes.
Steps 6–8 — Adjust CloudFront Settings
After initial deployment, two configuration adjustments are required:
Adjust Origin Protocol:
- Set Protocol to
HTTP only(since the origin ALB uses HTTP internally)
Adjust Cache Behavior:
- Viewer Protocol Policy: HTTP and HTTPS
- Allowed HTTP Methods: GET, HEAD, OPTIONS, PUT, POST, PATCH, DELETE
- Cache Policy: CachingOptimized
Save changes and wait for the CloudFront distribution to redeploy.
Once complete, access the application via the CloudFront Distribution Domain Name and verify HTTPS is enforced. Register a new email and confirm it appears in DynamoDB.
Part 3: Load Testing and Auto Scaling Validation
Step 1 — Connect to the EC2 Instance via SSH
Using VS Code with the Remote SSH extension, configure the connection:
Host <EC2-PUBLIC-IP>
  HostName <EC2-PUBLIC-IP>
  IdentityFile /path/to/ssh-aws-kb-boot.pem
  User ec2-user
  ServerAliveInterval 120
  ServerAliveCountMax 5
Note the ec2-user default Amazon Linux uses this as the default SSH user.
Step 2 — Run the Load Test with stress
Install and run the stress utility to artificially spike CPU utilization:
sudo yum install stress -y
stress -c 4
Open a second terminal to monitor process behavior:
ps aux --sort=-pcpu
top
Step 3 — Monitor Auto Scaling Behavior
Observe the following in the AWS Console:
- Elastic Beanstalk → Health — environment health degrades as CPU crosses the 50% threshold
- EC2 → Auto Scaling Groups → Activity — a new instance provisioning event is triggered
- EC2 → Instances — a third instance appears within minutes
This validates that the Auto Scaling Group is correctly configured to respond to CPU pressure by horizontally scaling the fleet, exactly the behavior required to support 10,000+ concurrent users during the live conference event.
Resource Cleanup
To avoid unnecessary charges, follow this teardown sequence:
- Elastic Beanstalk → Actions → Terminate Environment (~5 min)
- CloudFront → Disable Distribution (~5 min) → Delete
- DynamoDB → Tables → Delete

